Fitting Guide.
Lets get those stickers stuck!
If you are unsure of anything just reach out to us for advice. You can Contact Us on our contact page, or via Instagram – We try to reply as quickly as possible!
Use the table of contents to quickly jump to a specific section!
TABLE OF CONTENTS
SMALL STICKERS
The following method can be used for small stickers, for medium to large stickers please see the method further down the page.Step 1 is the MOST IMPORTANT part of fitting any sticker. It’s all in the prep, if the surface isn’t clean & fully dry the sticker wont stick. Please don’t use any Window Cleaners or other ammonia-based cleaners or soaps, this includes window ‘sealants’ and waxes.
1. CLEAN the surface with water and a drop of dish soap. Ensure the surface is COMPLETELY DRY before proceeding.

2. Prepare the sticker for application by firmly rubbing a squeegee over the sticker to ensure the vinyl is stuck to the transfer tape, This also removes any air bubbles which may have occurred during shipping.
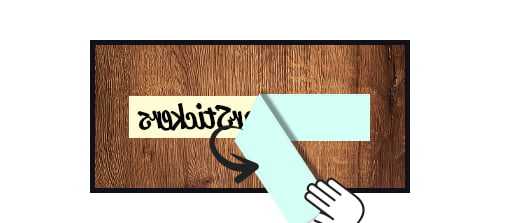
3. Flip the sticker over so it is the wrong side up and peel the backing paper away from the transfer tape, if the vinyl stays on the backing paper repeat step 2.

4. Carefully apply the sticker to the surface and rub over it with a squeegee or an old credit card working from the middle outwards to stick the sticker to the surface.

5. Slowly peel away the transfer tape at a 45° angle angle peel slow and steady making sure the sticker sticks to the surface and doesn’t lift.

6. All Done!
Take a snap and tag us on Instagram!
MEDIUM/LARGE STICKERS
The following method can be used for any size sticker, but is particularly useful for medium and large stickers.Step 1 is the MOST IMPORTANT part of fitting any sticker. It’s all in the prep, if the surface isn’t clean & fully dry the sticker wont stick. Please don’t use any Window Cleaners or other ammonia-based cleaners or soaps, this includes window ‘sealants’ and waxes.
1. CLEAN the surface with water and a drop of dish soap. Ensure the surface is COMPLETELY DRY before proceeding.

2. Use a tape measure to align the decal and apply masking tape at both ends of the sticker to hold it in place. Place a final piece of tape down the middle.
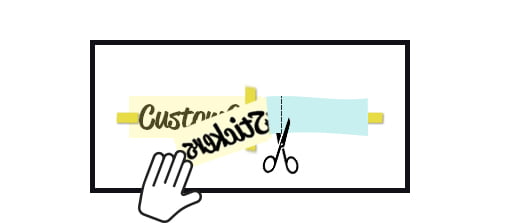
3. Cut one of the end pieces of masking tape and flip half of the sticker over. Peel half of the backing paper away from the transfer film then trim the excess backing paper and discard it.

4. Flip the sticker back back over and use the masking tape guides to align the first side of the sticker into the desired position, don’t let the sticker bunch up.

5. Using a plastic squeegee or credit card, apply firm pressure to stick the decal to the surface. Work from the centre outwards.

6. Remove the middle strip of masking tape then cut the tape on the other side. Flip the remaining side of the sticker over. Peel the backing paper away and discard it.

7. Flip the sticker back over and use the masking tape guides to align the second side of the sticker.

8. Using a plastic squeegee or credit card, apply firm pressure to second half and stick the decal to the surface. Work from the centre outwards.

9. Remove the transfer tape and any masking tape leftover. Peel the transfer film off at a 45° angle close to the sticker.

10. All Done!
Take a snap and tag us on Instagram!
SUNSTRIPS & VERY LARGE STICKERS
We recommend fitting sunstrips and very large decals with the same method shown above for Large Stickers. However we recommend having a helper friend as it’s easier with 2 people for stickers of this size.
We also recommend the ‘Wet Apply’ method. Simply mix a drop of dish soap with water, then spray the adhesive side of the sticker/sunstrip as you peel the backing paper off with this mixture. Position it, and using a plastic squeegee apply firm pressure from the centre outwards to remove all water. If using a credit card in place of a squeegee to apply a sunstrip, you should wrap the card in a microfibre cloth to prevent scratching the sunstrip!
If the decal or sunstrip is not adhering to the surface you will need to check all water is pressed out and leave it for some time to bond before attempting to remove any transfer films. We don’t recommend driving for a few hours after using the wet apply method to allow time for everything to fully dry. You may even need to allow some time to pass before you can trim up the edges of the sunstrip.
ADDITIONAL INFO
FITTING TEMPERATURE
Temperature is also important for fitting decals. Fitting stickers in the cold or onto cold surfaces is not recommended (below 10°C)
If fitting stickers in lower temperatures, try to do so in direct sunlight. Alternatively, you can provide a small amount of heat to the surface beforehand with a heat gun or hairdryer (Do not over-heat the area). Heating the decal again just before removing the transfer film can greatly improve adhesion and will allow the transfer film to peel away cleanly.
CREASES & BUBBLES
Crinkles in the transfer film that can occur when stickers are shipped in a tube, these will not show up when the sticker is applied though. These are in the transfer film and not the vinyl itself, don’t force these out when fitting and take time fitting large stickers by following our guide above.
If you encounter creases when fitting you can gently heat the the area and carefully lift the vinyl and then re-apply. (use a heat gun or hair dryer.)
Smaller bubbles of trapped air will naturally disappear over time. For larger bubbles, we recommend piercing the bubble with a clean sharp pin (be careful when handling sharp objects.)
MY STICKER WONT PEEL FROM THE BACKING PAPER
Reapply the transfer film and apply firm pressure over the decal to ensure the transfer film sticks to the decal, then proceed to remove backing paper from the sticker. If possible, lay the sticker flat face down and peel the backing paper away from the transfer film instead of peeling the transfer film up and away from the backing paper.
Heating the decal just before removing the transfer film can greatly improve adhesion and will allow the transfer film to peel away cleanly.
WHAT CAN YOU STICK OUR STICKERS TO
Our stickers will stick to any smooth painted surface or any glass that is thoroughly cleaned and free from dust, dirt, grime, and grease. e.g. windows, cars, bikes, smooth walls, toolboxes, ect.
Please do not fit our stickers on freshly painted surfaces. We recommend waiting at least 30 days before fitting any stickers to allow the paint to fully cure and off-gas.
Please note our stickers are not suitable for any textured surfaces. This includes textured/wallpapered walls, surfaces that contain rust, damaged lacquer or any other paint damage, stickers will also not stick to certain textured/bare plastics commonly used in vehicle interiors or ‘bare’ bumper trims.
FRESHLY PAINTED SURFACES
For freshly painted vehicle panels etc we advise waiting 4 weeks, the paint may be dry to the touch sooner, however the curing process can go on for many weeks. Early fitting may result in large bubbles as the paint tries to outgas, It may also lead to difficulty removing the sticker without causing damage to the paint.
For freshly painted walls we advise waiting 6 weeks before applying decals.
It is not advised to fit stickers to poorly prepped paint. Even if the paint is fully cured, the sticker may still take paint with it when removed if the paint job was low quality or the surface was not properly prepared.
NEED MORE HELP?
We would recommend contacting your local sign writer/professional to fit it for you. If you have any additional questions for us just get in touch through our contact us page. We will happily try to help you!
